Thanks for visiting our blog! My mom taught me that a good meal, made from scratch, can solve just about everything.The recipes on this blog are gentle on tummies, tasty, weight-loss promoting, and can be made without a fuss. Most of them are free of gluten, dairy, corn, and sweeteners. Best of all, they help those that eat them become more patient, more loving, and more kind. Please, keep in touch! Thanks again for visiting.
Showing posts with label THM E. Show all posts

Saturday, July 18, 2015

Gluten Free Sprouted Sourdough Bread

Dear Readers, I am SO happy to present you with this recipe today! It is such a winner and delicious every time. 


This recipe makes a miniloaf. I'm pretty sure you could double it to make a full-size loaf, but haven't tried it yet. Hopefully I will be able to do that tasty research tomorrow. :) 

1c sourdough starter (dipped out after any liquid has been poured off)
1c sprouted brown rice flour
1/2c filtered water
1t good-quality salt
Coconut oil for greasing the pan

Generously grease pan. Combine ingredents in a bowl and pour into pan. Allow to rise at least two hours, up to about four (longer than that it will still be yummy, but might have a flat appearance). For a crispy crust, place a pan of boiling water on the bottom rack of a 400-degree oven, and place bread on top rack. For a softer crust, simply bake at 350 degrees. Bread is done when the top is uniformly golden. :)

Bread will be easiest to remove from pan after it has cooled completely. 

This bread rose a little too long, so it fell a liitle while baking, however it was still incredibly delicious:

Happy baking!! :) Feel free to comment with questions. 


Wednesday, September 24, 2014

Fluffy Pancakes (Lowfat, Whole Grain, Gluten-Free THM E)

This recipe has revolutionized my life! I am a huge lover of pancakes, and am delighted to have created a delicious recipe that meets my many standards. This is actually Version 2.6; I've enjoyed developing it for weeks but didn't feel it was ready for the blog until today.


It's amazing to me (still!) that this is just one serving. It makes three humungous or nine small pancakes, enough for a nice tall stack. They would be good with berry pudding on them. However, my favorite way to eat them is straight out of the pan, plain, piping hot. 

Fluffy Pancakes (THM E)
1/4c sprouted buckwheat flour* 
1/4c sprouted millet flour*
1T protein powder (I use Brazil.nut protein powder, available from rawpower.com)
1/2t baking powder
1/4t baking soda
1/4t salt
1/2c warm water
1/2t coconut oil
1/2t vanilla
4 egg whites, beaten to soft peaks if desired

*see posts from earlier this week on making your own sprouted grain flour inexpensively, or order from organicsproutedflour.net

Preheat a cast iron skillet (if you do not have cast iron, do not preheat!). 

Combine dry ingredients. 

Stir well.

Beat egg whites, if you grew up doing such a thing. It was usually considered too much trouble in my family, but I married into it, and must admit the outcome is fluffier and tastier!

Add water and vanilla to dry ingredients, lightly mix. Stop before all the flour is incorporated to prevent toughness.

Add the optionally beaten egg whites. Lightly mix until completely combined, yet still airy. 


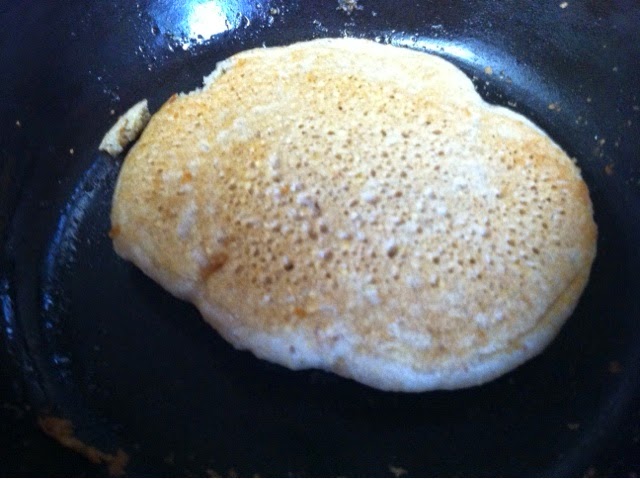
Make sure a drop of water sizzles when placed in the pan; if not, turn up the heat. Add a tiny bit of coconut oil (repeat this step before each pancake), spread it around, and pour in 1/3c batter per pancake. Treat as any other pancake you've made; turn when the bubbles pop throughout and cook a few minutes on the other side.


Bon appetit!


Make-ahead tip: when mixing the dry ingredients, make several batches worth, each in its own jar! This is what I do, and then it's easier to whip up next time, and fun to give a new-to-THM friend. 


P.s. Wondering what to do with four egg yolks? This is what I'm making with them: http://barcodefree.blogspot.com/2014/06/chocolate-or-carob-chia-seed-cream-pie.html?m=1

Nutritional information: Protein 21.2g, Fat 5g (includes cooking oil), Usable Carbohydrate 43g

Notes on 10/11/14: After a couple more weeks of making this recipe at home, I increased the amount of water from 1/3c to 1/2c. I am very satisfied with the result and so I changed this in the recipe. Also, after weeks of struggling with pancakes that stuck to the pan no matter what, today I cut a piece of parchment paper to fit the size of my skillet and cooked the last few pancakes of the day on that. It worked famously! After flipping, they don't stick, so I only use the parchment paper for the first side. Pancakes cooked this way brown in a fun tie-dyed pattern and stay MUCH moister than pancakes that have gotten stuck to the pan. I highly recommend you try this variation at home, folks! Instead of putting the 1/2t coconut oil in the pan, in this case, mix it with the warm water. After I experiment with this technique a couple more weeks, I may post a whole new version of the recipe-- but I didn't want to leavile you hanging with sticky pancakes even one day. ;)


Thursday, September 18, 2014

Sprouting Grains Day 1

"Why bother?" You may be asking. I understand, for the longest time it seemed like too much trouble for me, too. However then I started loving my food, gaining health and losing weight on Trim Healthy Mama. I was on a roll, and I wanted...a roll. A really good roll. A nice big yeasted one. And pancakes, with a texture I love, but great kindness to my steadily shrinking waistline. A muffin that didn't contribute to my muffin top. 

Since I'm allergen free as well as gluten free, this posed a real challenge. I like to read cookbooks for fun (really!) and in my searches, I found it challenging to find gluten free recipes that didn't also feature a whole bunch of cornstarch, tapioca starch or arrowroot powder (none of which are weightloss friendly). In fact I didn't find any.

Back at the ranch, I experimented. If you've baked gluten-free before, you know that gluten-free flours can be finicky. But here is the exciting news. Sprouted gluten free flours are very friendly to bake with. They are forgiving, cooperative, tractable. I can improvise with them, in different proportions, and some are more amazing  than others but I haven't had to throw any away. They have all tasted good. This is amazing!!!

Sprouted grain flours have lots of nutritional benefits, too. Apparently, I'm in it for the taste and portion size and weightloss, though. I have known about the nutritional benefits for many years thanks to the Weston A. Price Foundation, and have always soaked my hot cereal overnight as an adult, but haven't acted on sprouting until now.

In the last few weeks, I've developed a pancake recipe that will knock your socks off. You will not believe how many pancakes you get to eat for breakfast, or how delicious they are, or that they contain enough protein to help you sail through your morning with aplomb. The portions are so generous, I was SURE it was two servings, at least one and a half, until I ran the numbers tonight. In short, you will love it, and its' cousins, THM E gluten free yeast bread that can be made in an afternoon and THM E berry muffin. I am salivating just thinking about them. 

But I digress. The point is, to make this quality and generous portion size of THM E gluten free baked goods, you'll need sprouted grain flour. There is a high-quality source for it here: http://www.organicsproutedflour.net/sproutedflour.html
The grains and flours are about $5 for a one pound bag, some more and some less. Plus shipping. A wee bit out of my budget for the time being. To make the recipes I mentioned above, you'll need sprouted millet and sprouted buckwheat flours. So, place your order at Organic Sprouted Flours, or let's get sprouting! I would be sad it you had to wait and wait for your flour to be done once I posted that pancake recipe. 

My method for sprouting is the same for every grain. These pictures are of millet. Once sprouted and dried, grains can be easily ground to flour using a normal blender (no vitamix required). What follows is day one. Not sure if you'll have the necessary tools? You will need: the grain itself, water, a big bowl or pot (preferably glass, second choice stainless steel), a mesh strainer, a dehydrator or a cookie sheet and oven.

Start with a nice big bag of the grain you want to sprout. 


Put it in a bigger bowl than you think you'll need (it will swell a lot) and fill to the top with filtered water if you have access to it. 


Stir a bit to make sure none of the grains are left floating (floatijg grains won't absorb water enough to sprout). 


Place bowl in an undisturbed part of the kitchen and place a cooling rack on top.


Tuck into bed by covering with a kitchen towel to keep out dust. 


If you like, say a little blessing and think loving thoughts. It is the love that helps it grow and later nourish your family. 

There, was that easy enough? See you tomorrow for next steps, dear reader! 


Sunday, June 29, 2014

Simplest GF Sourdough Pan Bread (THM E)

From the files of simplicity, here is another foolproof three ingredient recipe. Super tasty, too! When you crave toast, this is your go-to. The panbreads can be shaped into any size you prefer. I like making them sanddollar sized, but they could definitely hold their own as sandwich or mini-pizza material. They are delightfully chewy and have the rich sourdough flavor of sharp cheese (a huge plus for this dairy free girl!).


1/3c active sourdough starter, allowed to settle and any clear liquid poured off*
1t psyllium husks
2 pinches of salt

Heat a cast iron skillet until very hot. Meanwhile, combine all ingredients and let sit just a moment, for batter to thicken. Shape breads with your hands- I like to make little balls the size of walnuts and then make them as thin and flat as I can. Place three in the pan (more if they fit) and cover. Flip with a good spatula when bread is golden and pan releases bread. Cook until golden color is achieved on the other side. Enjoy!! 

*To create your own sourdough starter, visit here to see the first day in the wild sourdough series: http://barcodefree.blogspot.com/2013/12/gluten-free-wild-sourdough-day-1.html?m=1

Saturday, June 7, 2014

Three Ingredient Skillet Biscuits

These are so quick, so easy and so good! They don't require any dairy or gluten ingredients and are a perfect E addition to a meal. I eat this whole recipe, which makes four or five biscuits, as one serving, alongside an additional protein source and vegetable. These also make a good breakfast if you smother them with berry pudding. You might be more generous than me and choose to share, or scale up the recipe. Hope you enjoy it!

(Shown here in a supporting role as a foundation for strawberry shortcake. Lemon pudding serves as faux whipped cream.)


2 egg whites
1/3c quinoa flakes
salt to taste

Turn on the heat under seasoned a cast iron skillet and allow pan to get very hot. Do not oil pan; oil would smoke at this temperature. Meanwhile, using a fork, combine all ingredients. Plop into pan, cook a minute or two, then flip using a good metal spatula. Cook another minute or two and serve immediately. Bon appetit!

Notes

I do not use oil in this recipe because it would smoke in the very hot pan. However if you do not have a cast iron pan, run to local flea market as fast as you can-- I mean, use a stainless steel pan with a little oil.

Quinoa flakes can be purchased here, though they would probably be cheaper in the bulk section of your coop: http://m.vitacost.com/products/ancient-harvest-organic-quinoa-flakes-gluten-free-12-oz-7

If you do not currently have access to quinoa flakes and need to substitute oats, use a blender to chop them up before using them in this recipe: Full disclosure: I haven't tried this because I can't eat oats. ;)


Saturday, May 3, 2014

Pear Coffee Cake with Brazil Nut Crumb Topping


This recipe was inspired by Mrs. Criddle's Upside Down Apple Cake. Thanks Mrs. Criddle! Though it doesn't bear much resemblance to the original, it wouldn't have come about without it.

The week I experienced a windfall of 6 ripe pears, purchased for 25 cents a pound. Score! They have been the subject of my experimentation here. I'm sure you could use apples successfully in this recipe, as well. I'm really happy with the result!! 

This recipe serves two. Hint: Serve with another source of protein... I like it with a smoothie. :)

Crumb Topping

2T brazil nut protein powder
1/2t cinnamon
Dash freshly-ground nutmeg
Pinch of salt
1t coconut oil

Combine dry ingredients. With a fork, mash in coconut oil. 

Cake Batter
2/3c quinoa flakes
1/2t salt
1/2t baking powder
1t cinnamon
Dash of fresh nutmeg
1t vanilla
4 egg whites
1 pear, cored and diced into 1/2" cubes

Preheat oven to 350. Lightly grease glass loaf pan with coconut oil. Combine dry ingredients. Add vanilla and egg whites and mix well. Swirl in half of crumb topping. Gently fold pear into batter. Using a rubber spatula, gently coax mixture into loaf pan. Sprinkle remaining crumb topping on top. Place pan in the oven. Bake cake a total of 30 minutes, and let sit in pan until mainly cool, 20 minutes. Enjoy!

Per Serving (2 Servings) Net Carbohydrate 34g Protein 16g Fat 5.5g