Thanks for visiting our blog! My mom taught me that a good meal, made from scratch, can solve just about everything.The recipes on this blog are gentle on tummies, tasty, weight-loss promoting, and can be made without a fuss. Most of them are free of gluten, dairy, corn, and sweeteners. Best of all, they help those that eat them become more patient, more loving, and more kind. Please, keep in touch! Thanks again for visiting.

Friday, September 26, 2014

Oatmeal Raisin Cookies (Gluten Free, Sprouted Grain, Protein Packed)


This non Trim Healthy Mama recipe was developed for my partner, who needs extra protein-rich snacks to eat at work. I took my inspiration from this recipe: http://thehealthyfoodie.com/high-protein-heatlhy-oatmeal-cookies/
If you are a Trim Healthy Mama, do not use my recipe, instead use the link above and make sure to choose a sprouted grain flour and substitute unsweetened dried cranberries for the raisins.

1 1/3c sprouted brown rice flour
2/3c arrowroot powder
1T baking powder
1t salt
3/4c Brazil nut protein powder (available from rawpower.com)
2T cinnamon

3/4c butter (1 1/2 sticks), softened at room temperature
1/4c honey
6 eggs
3/4c applesauce 
1/4c milk or milk substitute
1T vanilla

4c gluten free oats (may substitute quinoa flakes)
2c raisins
1c finely chopped almonds

Preheat oven to 350 degrees. If butter is not already soft, put it on the warm stovetop to soften, but keep a close eye on it. ;)

In a very large bowl, combine first six ingredients and whisk well.

In a separate bowl, cream honey and butter. Beat in remaining wet ingredients. I used a whisk because I do not have a blender, and did just fine.

Pour wet ingredients into dry, and mix gingerly with a wooden spoon. Fold in oats, raisins, and chopped almonds.

Form cookies using a 1/4c measure. Place on a cookie sheet which you have either greased or lined with a piece of parchment paper. Press down each cookie; cookies do not spread during baking. Bake until the bottoms of the cookies are lightly golden. After cooling, we like to store these in the freezer in an airtight container, and just take a couple out at a time to pack in lunches. 


Wednesday, September 24, 2014

Turning Sprouted Grains into Flour

It's stunningly easy to turn sprouted grains into flour once they have been dehydrated. Just blend in the blender, using a pint jar withthe blender blade screwed on (somehow having the grains contained in a jar ensures they all get well blended). Count aloud to notice how long it takes for all visible grains to be ground to flour, then count to that number once more to be sure the interior grains are completely blended as well. Give a little shake and you're all set! Sprouted grains are much softer than unsprouted, so it shouldn't be a problem if a few grains are cracked but not completely ground. 


Fluffy Pancakes (Lowfat, Whole Grain, Gluten-Free THM E)

This recipe has revolutionized my life! I am a huge lover of pancakes, and am delighted to have created a delicious recipe that meets my many standards. This is actually Version 2.6; I've enjoyed developing it for weeks but didn't feel it was ready for the blog until today.


It's amazing to me (still!) that this is just one serving. It makes three humungous or nine small pancakes, enough for a nice tall stack. They would be good with berry pudding on them. However, my favorite way to eat them is straight out of the pan, plain, piping hot. 

Fluffy Pancakes (THM E)
1/4c sprouted buckwheat flour* 
1/4c sprouted millet flour*
1T protein powder (I use Brazil.nut protein powder, available from rawpower.com)
1/2t baking powder
1/4t baking soda
1/4t salt
1/2c warm water
1/2t coconut oil
1/2t vanilla
4 egg whites, beaten to soft peaks if desired

*see posts from earlier this week on making your own sprouted grain flour inexpensively, or order from organicsproutedflour.net

Preheat a cast iron skillet (if you do not have cast iron, do not preheat!). 

Combine dry ingredients. 

Stir well.

Beat egg whites, if you grew up doing such a thing. It was usually considered too much trouble in my family, but I married into it, and must admit the outcome is fluffier and tastier!

Add water and vanilla to dry ingredients, lightly mix. Stop before all the flour is incorporated to prevent toughness.

Add the optionally beaten egg whites. Lightly mix until completely combined, yet still airy. 


Make sure a drop of water sizzles when placed in the pan; if not, turn up the heat. Add a tiny bit of coconut oil (repeat this step before each pancake), spread it around, and pour in 1/3c batter per pancake. Treat as any other pancake you've made; turn when the bubbles pop throughout and cook a few minutes on the other side.


Bon appetit!


Make-ahead tip: when mixing the dry ingredients, make several batches worth, each in its own jar! This is what I do, and then it's easier to whip up next time, and fun to give a new-to-THM friend. 


P.s. Wondering what to do with four egg yolks? This is what I'm making with them: http://barcodefree.blogspot.com/2014/06/chocolate-or-carob-chia-seed-cream-pie.html?m=1

Nutritional information: Protein 21.2g, Fat 5g (includes cooking oil), Usable Carbohydrate 43g

Notes on 10/11/14: After a couple more weeks of making this recipe at home, I increased the amount of water from 1/3c to 1/2c. I am very satisfied with the result and so I changed this in the recipe. Also, after weeks of struggling with pancakes that stuck to the pan no matter what, today I cut a piece of parchment paper to fit the size of my skillet and cooked the last few pancakes of the day on that. It worked famously! After flipping, they don't stick, so I only use the parchment paper for the first side. Pancakes cooked this way brown in a fun tie-dyed pattern and stay MUCH moister than pancakes that have gotten stuck to the pan. I highly recommend you try this variation at home, folks! Instead of putting the 1/2t coconut oil in the pan, in this case, mix it with the warm water. After I experiment with this technique a couple more weeks, I may post a whole new version of the recipe-- but I didn't want to leavile you hanging with sticky pancakes even one day. ;)


Tuesday, September 23, 2014

Sprouting Grains Day 3.5

Yay and hooray! The day has arrived! Time to dry these little sprouts so they will soon turn into something super tasty! Spread sprouted grains on a cookie sheet and place in a warm oven (lowest temp possible) all day. Visit periodically to stir and ensure even drying. It is likely you will need to continue the process for awhile-- by checking in frequently, you will know when they are done! 

Alternately, put grains in a dehydrator for 24 hours. I have a Nesco dehydrator that I got on sale for $40 this time of year three years back. It has been wonderful and we have used it a TON! On the downside it is plastic, but on the upside we could afford it. :) And it was made in the USA. I dehydrated my grains for 24 hours on the lowest setting. After that much time elapsed, they were more than done, even though I didn't stir them once. Very convenient. 

However you dehydrate your grains, allow them to rest until they come to room temperature. Then transfer them to airtight containers in the refrigerator. T

Sunday, September 21, 2014

Sprouting Grains Day 3

Here's how everything looks. I've rinsed 3 times today. 

I could go ahead and put them in the dehydrator tonight, but I need to go to bed! So I'll wait until morning. I just rinsed them and they will be fine 'til morning. I like to make sure that nearly every grain has had a chance to sprout, so it's all good. See you tomorrow! 

Sprouting Grains Day 2.5

It took 36 hours for bubbles to appear in the millet in great numbers, and I was so busy this morning neglected it for several hours. When grain is ready to be drained for sprouting, each piece releases a tiny bubble. If I jiggle this bowl of VEY READY millet, it actually looks like it is boiling for a moment after! A less-neglected bowl just might appear to be barely beginning to simmer. 


I drained the millet. Isn't it pretty and vibrant-looking? 

When I first sprouted grains I had very little equipment. I would put the strainer in a bowl, cover with a glass lid, and leave the sprouts to do their thing. To rinse, I would briefly rinse the bowl, then fill it with water and dump the grains in. After a swish swish, I'd return them to the strainer / bowl / glass lid setup. This always worked beautifully. Note that as sprouts make progress, they will expand in volume. Rinse 2-3x per day, watching for the first sign of little white tails that indicate your sprouts are ready to dry. Yay! 

Thanks to Goodwill, I now have a slightly more sophisticated system: the Sprout Master, apparently made in the seventies and never removed from its packaging! Many other sprouting contraptions are on the market. Anyway, this is what mine looks like. 


View of drainage holes on the bottom:

I removed the loose-fitting lid to show the millet. Whatever setup you use, make sure the grain is covered to keep out dust, yet ventilated. 

As the French have it, a demain!


Friday, September 19, 2014

Sprouting Grains Day 2...Wait

Today, we don't need to do much, if you are sprouting millet as I am. It needs to continue its nice long soak! When hundreds of little bubbles appear (probably today if you are sprouting buckwheat), drain off the water and leave the sprouts so that they stay moist but not boggy. A picture of this step will follow tomorrow.

Thursday, September 18, 2014

Sprouting Grains Day 1

"Why bother?" You may be asking. I understand, for the longest time it seemed like too much trouble for me, too. However then I started loving my food, gaining health and losing weight on Trim Healthy Mama. I was on a roll, and I wanted...a roll. A really good roll. A nice big yeasted one. And pancakes, with a texture I love, but great kindness to my steadily shrinking waistline. A muffin that didn't contribute to my muffin top. 

Since I'm allergen free as well as gluten free, this posed a real challenge. I like to read cookbooks for fun (really!) and in my searches, I found it challenging to find gluten free recipes that didn't also feature a whole bunch of cornstarch, tapioca starch or arrowroot powder (none of which are weightloss friendly). In fact I didn't find any.

Back at the ranch, I experimented. If you've baked gluten-free before, you know that gluten-free flours can be finicky. But here is the exciting news. Sprouted gluten free flours are very friendly to bake with. They are forgiving, cooperative, tractable. I can improvise with them, in different proportions, and some are more amazing  than others but I haven't had to throw any away. They have all tasted good. This is amazing!!!

Sprouted grain flours have lots of nutritional benefits, too. Apparently, I'm in it for the taste and portion size and weightloss, though. I have known about the nutritional benefits for many years thanks to the Weston A. Price Foundation, and have always soaked my hot cereal overnight as an adult, but haven't acted on sprouting until now.

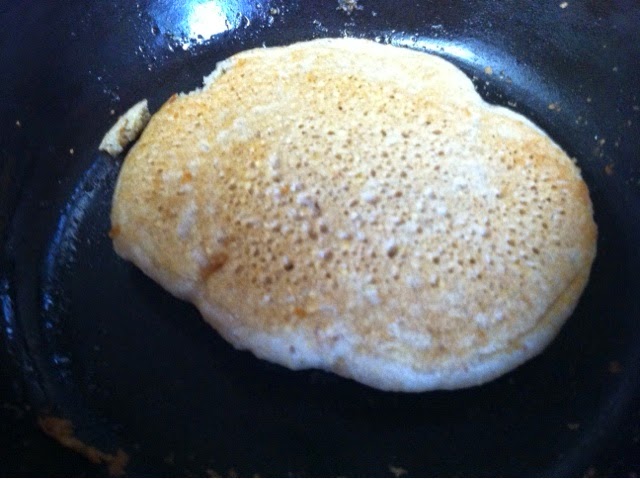
In the last few weeks, I've developed a pancake recipe that will knock your socks off. You will not believe how many pancakes you get to eat for breakfast, or how delicious they are, or that they contain enough protein to help you sail through your morning with aplomb. The portions are so generous, I was SURE it was two servings, at least one and a half, until I ran the numbers tonight. In short, you will love it, and its' cousins, THM E gluten free yeast bread that can be made in an afternoon and THM E berry muffin. I am salivating just thinking about them. 

But I digress. The point is, to make this quality and generous portion size of THM E gluten free baked goods, you'll need sprouted grain flour. There is a high-quality source for it here: http://www.organicsproutedflour.net/sproutedflour.html
The grains and flours are about $5 for a one pound bag, some more and some less. Plus shipping. A wee bit out of my budget for the time being. To make the recipes I mentioned above, you'll need sprouted millet and sprouted buckwheat flours. So, place your order at Organic Sprouted Flours, or let's get sprouting! I would be sad it you had to wait and wait for your flour to be done once I posted that pancake recipe. 

My method for sprouting is the same for every grain. These pictures are of millet. Once sprouted and dried, grains can be easily ground to flour using a normal blender (no vitamix required). What follows is day one. Not sure if you'll have the necessary tools? You will need: the grain itself, water, a big bowl or pot (preferably glass, second choice stainless steel), a mesh strainer, a dehydrator or a cookie sheet and oven.

Start with a nice big bag of the grain you want to sprout. 


Put it in a bigger bowl than you think you'll need (it will swell a lot) and fill to the top with filtered water if you have access to it. 


Stir a bit to make sure none of the grains are left floating (floatijg grains won't absorb water enough to sprout). 


Place bowl in an undisturbed part of the kitchen and place a cooling rack on top.


Tuck into bed by covering with a kitchen towel to keep out dust. 


If you like, say a little blessing and think loving thoughts. It is the love that helps it grow and later nourish your family. 

There, was that easy enough? See you tomorrow for next steps, dear reader! 


Monday, September 1, 2014

Bone Broth, AKA Fruits of the Spirit Juice

Can a food really make you more patient, more loving and more kind? This one can. How many recipes can do that? :)
I experience much greater health and happiness if I eat 2c of broth every day. It is the ultimate in fast food, too. It's great in a mug with a little sea salt, or heat it up with some meat and vegetables added and you have a gourmet meal in a matter of minutes. Broth, how do I love thee...let me count the ways! 


Basic Broth Recipe
Carcass from roasted chicken or turkey, picked clean (yum!), or beef / goat / pork bones, roasted at 350 until they smell delicious
Carrot
2 ribs celery
2 mushrooms
2 cloves garlic
1 onion or leek
4-6 peppercorns

Combine ingredients in a large pot, bring to a boil and simmer 24 hours.  Fill sink with cold water. Meanwhile, strain liquid into a different pot (if you have one). Place pot of strained broth in sink until no longer hot, but still plenty warm. Pour into quart-sized canning jars and cover with bands and lids. Return jars to sinkful of water to finish cooling. Some jars will seal. Put these at the back of the fridge; they will keep longer than the others. Use broth within 10 days. This recipe is very light, for THM you can use it as S or skim off most fat for E or FP.