Thanks for visiting our blog! My mom taught me that a good meal, made from scratch, can solve just about everything.The recipes on this blog are gentle on tummies, tasty, weight-loss promoting, and can be made without a fuss. Most of them are free of gluten, dairy, corn, and sweeteners. Best of all, they help those that eat them become more patient, more loving, and more kind. Please, keep in touch! Thanks again for visiting.

Tuesday, December 30, 2014

Super Easy Dairy-Free Cheesecake

Well, I am blessed, to say the least. In the (long!) time since I've last posted here, I had a birthday, and my loving partner made me an amazing on-plan, allergen and sweetener-free dessert! This recipe is her creation, and it has now become a weekly staple. I'm excited to share it with you here.

When I started Trim Healthy Mama, I was eating dairy, and I loved the Chunky Cheese Pops. It was sad to give them up, but now, FINALLY, I have a suitable on-plan, dairy, egg, nut and sweetener free replacement. It is definitely a decadent, calorie-rich S. I freeze the filling in half-cup Ball jars and bring it in my lunch on super long days. That way, I am not at risk of eating it to excess, as I would be if an entire cake were calling me from the fridge. It is perfect for those leading a very active lifestyle, and would also be great for pregnant and nursing moms. Others may want to limit consumption to once or twice a week. It has enough protein to count as a complete snack. 

I hope this simple, adaptable recipe will bless you and help you succeed on your journey to health! 

Dairy-Free Cheesecake Filling
1c seed or nut butter (unsweetened sunflower seed butter works great, and has the advantage of not tasting as tempting straight out of the jar as almond butter or peanut butter.)
1c coconut cream (store a can of full fat coconut milk in the fridge until ready to make recipe. Skim off solids, which will amoung to about a cup.)
2T coconut milk liquid (from the same can)
2c frozen berries (I like raspberries, or mixed berries)
1 t vanilla (or contents of 1/2 vanilla bean, for special occasions)
1/4t salt

Blend all ingredients on High until well-combined. You will need to stop and stir often, and you may need to add more coconut milk liquid to blend, however, add as little as possible. No Vitamix required! My little beehive blender needs patience and encouragement to complete this task, but it does the job just fine. 

Dairy-Free Cheesecake Crust
2c nuts or seeds, ground in a pint jar attached to the blender
2T coconut oil
1/2c coconut butter
Dash salt
1t cinnamon
1/2t vanilla
Gently melt the coconut oil and butter, then stir in other ingredients. Press into a pie plate, reserving a small amount to sprinkle on top. Add filling, decorate with remaining crust and fresh berries if desired, and refrigerate overnight. 

Bon appetit! 

Saturday, November 8, 2014

Seafood Vegetable Chowder (GF, DF)

Some recipes are love-at-first-try. This was one of them! So wonderfully tasty. I don't throw the word "scrumptious" around without meaning it, and this nourishing, lowfat, carb-reasonable dinner earned it fair and square. It's quick to make, too.


2c homemade chicken broth, mainly free of fat
1/2t salt
4-inch long section of a large leek (white part)
5-inch parsnip
1 c cauliflower (cauliholics might want a bit more)
1 handful of whitefish, cut into bite-sized pieces (frozen okay)
1 handful of wild baby shrimp (frozen okay)
1 handful of green beans
1 clove garlic, chopped fine or put through a garlic press

Place a small pot on the stove over medium heat. Cheerfully make your way down the list in order, cleaning each item, chopping it, and adding it to the pot. Chop everything fairly fine except the cauliflower and green beans, which can be bite sized. Once everything has been added, make sure chowder comes fo a vigorous boil and stays there 2-3 minutes. Check the fish to make sure it is opaque, taste a bit of parsnip to make sure it is tender, and make sure the broth is to your liking. Serves one or two; best when served immediately. 


Tuesday, October 21, 2014

Sprouted Brown Rice Yeast Bread (A Bread Recipe for Family)

I found a great, super simple sprouted brown rice flour bread recipe! It is not THM, but is a good compromise for family members that don't need to lose weight. Hope your family will  enjoy this lots! Since it is not my recipe, I'm including a link to the source. However, please note my changes here: 

A Few Notes / Changes 
I greased the pans VERY well with coconut oil. Instead of kefir, I used 1 1/2 c warm water and 1/2 c coconut milk. Since I had them on hand, I also tossed in a couple extra egg yolks. Instead of baking powder and soda, I used 1 1/2t dry yeast. I combined it with the liquids and let it sit for about 15 minutes before combining with the other ingredients.  I preheated the oven to 115 and then turned it off, and rose the bread for an hour, reheating the oven and turning it off again once mid-rise. Then, without taking the bread out of the oven, I turned the oven on to 350. I allowed it to bake until the crust was uniformly very brown. Enjoy! :)


Saturday, October 11, 2014

How to Manage a Cold with THM Foods


This week, after my partner suffered from a terrible cold, I started to wake up each morning with a hint of a sore throat. "Hmmm, I must be next," I thought each morning...until I had my daily protein-rich skinny chocolate for breakfast and it went away completely! I was grateful for the reprieve as, right now, we are needing to be careful with our finances and I work for myself. Amazingly, as long as I ate S meals, I could keep my cold at bay. However, as the weekend came, I knew I needed to confront it eventually. I switched up my fuel types and let myself get sick.

That's pretty amazing, isn't it, to be able to press "Pause" on a cold! One of the many side bonuses of being a Trim Healthy Mama.

So now that I am sick, what have I discovered about how to heal well as a Trim Healthy Mama? Well, first, I have learned that we are wonderfully made. It is a blessing for me to be forced to rest in God, and be completely reliant on Divine Love to guide me and help me get better. If we never got sick, it would be hard to remember that we are just human. It's easy to think of ourselves as quite the big shots, until we are flat on our backs with some illness or another. Most times I get sick, when I am well again, I am better than ever. That is, God uses my times of illness to work on my heart and help me grow. Thank goodness for the common cold, and especially, for God's wisdom and generous love.

So what is a sneezing, sniffling, hoarse, coughing, sleepy Trim Healthy Mama to live on? Let's start with drinks. 

I have found that the things I enjoy when I am well-- like big jugs of water, flavored with lemon juice, grated ginger and salt-- actually have made me feel worse during this cold. I have found that hot liquids are key to healing quickly and reducing suffering in the meantime. Try to drink just as many fluids as you normally would, just have them hot. Yesterday, I drank 4 quarts of hot herbal tea (one teabag per quart jar; cover to intensify steeping), two quarts of homemade chicken broth with sea salt (I usually only have with a meal, even though FP, but made an exception here) and one quart of homemade mushroom broth. I also made a quart of tea before bed and wrapped it in a wool blanket so I could get up and drink it in the middle of the night, when my congestion is the worst. It was wonderful!

And for food?

I am an unapologetic purist, whole foods THM with some food allergies. So, I always have clean lettuce and homemade broth in my fridge and bite size frozen chicken breast, and beef and turkey meatballs in my freezer. These have helped me out big time! I know that every cold is different, but here are the foods that have really helped relieve my cold symptoms this time around. 

-stir-fry: cabbage, ginger, garlic, mushrooms and ground turkey breast cooked in 1t coconut oil
-salad: huge bowl of lettuce with cilantro, parsley, orange pepper, a can of salmon and lemon juice
-simple chicken soup: chicken breast with mushrooms and garlic cooked in homemade broth
-ragout: zucchini, onion, garlic, a tomato and chicken breast cooked in 1t coconut oil
-another salad: big bowl of lettuce with cilantro, parsley, tomato and a package of water-packed sardines, drizzled with naturally fermented soy sauce and lemon juice

You'll notice that all these meals are Fuel Pull (or, Fun Protein as my partner calls them!). I did this deliberately for a day because really, I need to be sick this weekend, and better by Monday if possible. :) I didn't want to delay the onset any more with S meals, or intensify the illness needlessly with E meals on the worst day of illness. I'm switching to E meals for day two of my cold, once I'm feeling a bit better. 

I hope these suggestions help you have a sweet, healing time with your Creator, and get well soon! 

Update Sunday morning: I'm feeling much better today! My sore throat and the pressure in my head are gone; it really feels like this cold is behind me. I'm grateful to Jesus for hearing my prayers in the night when I was uncomfortable and easing my way. Now, I'm super duper excited for an S day to speedily clear out the remains of my cold. Skinny chocolate, here I come! :)

Many thanks to Serene and Pearl for the versatile, wonderful tool of THM, effectively put to use here to move along my cold speedily! 

Just to review here is the approach I took:
To delay onset of cold: S days only (no more than 3 days)
To bring on cold when ready to deal with it: FP day, hot liquids
To intensify symptoms and work through cold: E day, hot liquids
To clear out remains of cold once better: S day

Crustless Pumpkin Pie (GF, DF, Sweetener Free, THM E Meal)

Super zowie. This is the best! I was tempted to name this recipe Fantasy Pumpkin Pie because you can eat the whole pie, as a complete E meal, in one sitting, and still lose weight. If that floats your boat. As I dreamed up this recipe, which is modified from an earlier version my partner developed just for me, I never imagined that it would fill a whole pie plate. But here it is, in real life, with a serving size of one, so it must be true. 

It is easiest if you have already baked the pumpkin and sweet potato before making the pie; otherwise it turns into quite the day-long project. However, if you just pop the well-pierced pumpkin and sweet potato in a baking dish and put them in the oven when you get home one night, and save them in the fridge 'til you are craving pie, it will be a piece of cake. ;) 

Incidentally, Sally Fallon of the Weston A. Price Foundation recommends allowing baked sweet potatoes to rest at room temperature for 12 hours before eating. I find this increases their sweet caramel flavor and makes them more digestable. When I made this pie recipe, after baking the sweet potato and pumpkin, I simply left them in the oven and turned it off. I peeled and refrigerated them the next day. Very easy...much easier than handling piping hot squash and potato!

So, without further ado, here is the recipe you have been waiting for.

Pumpkin Pie

4 egg whites
1/2c lite coconut milk (shake can before opening)
1/2c water
1t vanilla
1/2t salt
4t cinnamon
1 1/2t powdered ginger
1/4t ground cloves
dash nutmeg 
1 1/4c cooked pumpkin
3/4c cooked sweet potato
1/2t coconut oil for greasing the pie plate

Preheat oven to 400 degrees. Pour all ingredients except the coconut oil into the blender. Blend until smooth and uniform. Grease 9" pie plate and fill with pumpkin mixture. 


Bake ten minutes, reduce temperature to 350, and bake until set (thirty minutes more). 


Allow to cool to room temperature before transferring to refrigerator. Serve chilled. 


Even my glutenful, dairyful, non-THM partner loves it! I hope you and your loved ones will, too. 

Friday, September 26, 2014

Oatmeal Raisin Cookies (Gluten Free, Sprouted Grain, Protein Packed)


This non Trim Healthy Mama recipe was developed for my partner, who needs extra protein-rich snacks to eat at work. I took my inspiration from this recipe: http://thehealthyfoodie.com/high-protein-heatlhy-oatmeal-cookies/
If you are a Trim Healthy Mama, do not use my recipe, instead use the link above and make sure to choose a sprouted grain flour and substitute unsweetened dried cranberries for the raisins.

1 1/3c sprouted brown rice flour
2/3c arrowroot powder
1T baking powder
1t salt
3/4c Brazil nut protein powder (available from rawpower.com)
2T cinnamon

3/4c butter (1 1/2 sticks), softened at room temperature
1/4c honey
6 eggs
3/4c applesauce 
1/4c milk or milk substitute
1T vanilla

4c gluten free oats (may substitute quinoa flakes)
2c raisins
1c finely chopped almonds

Preheat oven to 350 degrees. If butter is not already soft, put it on the warm stovetop to soften, but keep a close eye on it. ;)

In a very large bowl, combine first six ingredients and whisk well.

In a separate bowl, cream honey and butter. Beat in remaining wet ingredients. I used a whisk because I do not have a blender, and did just fine.

Pour wet ingredients into dry, and mix gingerly with a wooden spoon. Fold in oats, raisins, and chopped almonds.

Form cookies using a 1/4c measure. Place on a cookie sheet which you have either greased or lined with a piece of parchment paper. Press down each cookie; cookies do not spread during baking. Bake until the bottoms of the cookies are lightly golden. After cooling, we like to store these in the freezer in an airtight container, and just take a couple out at a time to pack in lunches. 


Wednesday, September 24, 2014

Turning Sprouted Grains into Flour

It's stunningly easy to turn sprouted grains into flour once they have been dehydrated. Just blend in the blender, using a pint jar withthe blender blade screwed on (somehow having the grains contained in a jar ensures they all get well blended). Count aloud to notice how long it takes for all visible grains to be ground to flour, then count to that number once more to be sure the interior grains are completely blended as well. Give a little shake and you're all set! Sprouted grains are much softer than unsprouted, so it shouldn't be a problem if a few grains are cracked but not completely ground. 


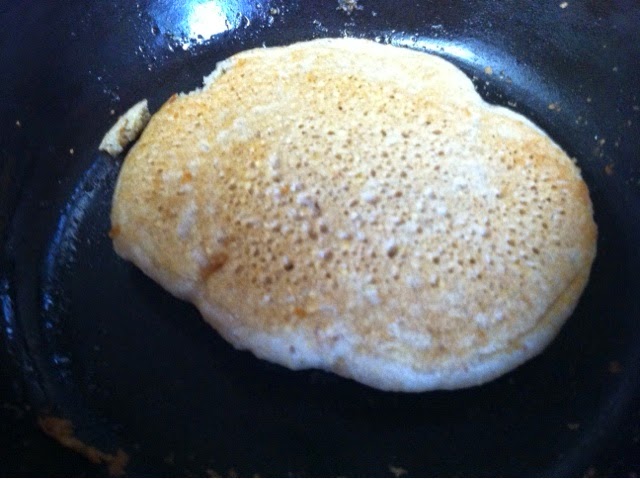
Fluffy Pancakes (Lowfat, Whole Grain, Gluten-Free THM E)

This recipe has revolutionized my life! I am a huge lover of pancakes, and am delighted to have created a delicious recipe that meets my many standards. This is actually Version 2.6; I've enjoyed developing it for weeks but didn't feel it was ready for the blog until today.


It's amazing to me (still!) that this is just one serving. It makes three humungous or nine small pancakes, enough for a nice tall stack. They would be good with berry pudding on them. However, my favorite way to eat them is straight out of the pan, plain, piping hot. 

Fluffy Pancakes (THM E)
1/4c sprouted buckwheat flour* 
1/4c sprouted millet flour*
1T protein powder (I use Brazil.nut protein powder, available from rawpower.com)
1/2t baking powder
1/4t baking soda
1/4t salt
1/2c warm water
1/2t coconut oil
1/2t vanilla
4 egg whites, beaten to soft peaks if desired

*see posts from earlier this week on making your own sprouted grain flour inexpensively, or order from organicsproutedflour.net

Preheat a cast iron skillet (if you do not have cast iron, do not preheat!). 

Combine dry ingredients. 

Stir well.

Beat egg whites, if you grew up doing such a thing. It was usually considered too much trouble in my family, but I married into it, and must admit the outcome is fluffier and tastier!

Add water and vanilla to dry ingredients, lightly mix. Stop before all the flour is incorporated to prevent toughness.

Add the optionally beaten egg whites. Lightly mix until completely combined, yet still airy. 


Make sure a drop of water sizzles when placed in the pan; if not, turn up the heat. Add a tiny bit of coconut oil (repeat this step before each pancake), spread it around, and pour in 1/3c batter per pancake. Treat as any other pancake you've made; turn when the bubbles pop throughout and cook a few minutes on the other side.


Bon appetit!


Make-ahead tip: when mixing the dry ingredients, make several batches worth, each in its own jar! This is what I do, and then it's easier to whip up next time, and fun to give a new-to-THM friend. 


P.s. Wondering what to do with four egg yolks? This is what I'm making with them: http://barcodefree.blogspot.com/2014/06/chocolate-or-carob-chia-seed-cream-pie.html?m=1

Nutritional information: Protein 21.2g, Fat 5g (includes cooking oil), Usable Carbohydrate 43g

Notes on 10/11/14: After a couple more weeks of making this recipe at home, I increased the amount of water from 1/3c to 1/2c. I am very satisfied with the result and so I changed this in the recipe. Also, after weeks of struggling with pancakes that stuck to the pan no matter what, today I cut a piece of parchment paper to fit the size of my skillet and cooked the last few pancakes of the day on that. It worked famously! After flipping, they don't stick, so I only use the parchment paper for the first side. Pancakes cooked this way brown in a fun tie-dyed pattern and stay MUCH moister than pancakes that have gotten stuck to the pan. I highly recommend you try this variation at home, folks! Instead of putting the 1/2t coconut oil in the pan, in this case, mix it with the warm water. After I experiment with this technique a couple more weeks, I may post a whole new version of the recipe-- but I didn't want to leavile you hanging with sticky pancakes even one day. ;)


Tuesday, September 23, 2014

Sprouting Grains Day 3.5

Yay and hooray! The day has arrived! Time to dry these little sprouts so they will soon turn into something super tasty! Spread sprouted grains on a cookie sheet and place in a warm oven (lowest temp possible) all day. Visit periodically to stir and ensure even drying. It is likely you will need to continue the process for awhile-- by checking in frequently, you will know when they are done! 

Alternately, put grains in a dehydrator for 24 hours. I have a Nesco dehydrator that I got on sale for $40 this time of year three years back. It has been wonderful and we have used it a TON! On the downside it is plastic, but on the upside we could afford it. :) And it was made in the USA. I dehydrated my grains for 24 hours on the lowest setting. After that much time elapsed, they were more than done, even though I didn't stir them once. Very convenient. 

However you dehydrate your grains, allow them to rest until they come to room temperature. Then transfer them to airtight containers in the refrigerator. T

Sunday, September 21, 2014

Sprouting Grains Day 3

Here's how everything looks. I've rinsed 3 times today. 

I could go ahead and put them in the dehydrator tonight, but I need to go to bed! So I'll wait until morning. I just rinsed them and they will be fine 'til morning. I like to make sure that nearly every grain has had a chance to sprout, so it's all good. See you tomorrow! 

Sprouting Grains Day 2.5

It took 36 hours for bubbles to appear in the millet in great numbers, and I was so busy this morning neglected it for several hours. When grain is ready to be drained for sprouting, each piece releases a tiny bubble. If I jiggle this bowl of VEY READY millet, it actually looks like it is boiling for a moment after! A less-neglected bowl just might appear to be barely beginning to simmer. 


I drained the millet. Isn't it pretty and vibrant-looking? 

When I first sprouted grains I had very little equipment. I would put the strainer in a bowl, cover with a glass lid, and leave the sprouts to do their thing. To rinse, I would briefly rinse the bowl, then fill it with water and dump the grains in. After a swish swish, I'd return them to the strainer / bowl / glass lid setup. This always worked beautifully. Note that as sprouts make progress, they will expand in volume. Rinse 2-3x per day, watching for the first sign of little white tails that indicate your sprouts are ready to dry. Yay! 

Thanks to Goodwill, I now have a slightly more sophisticated system: the Sprout Master, apparently made in the seventies and never removed from its packaging! Many other sprouting contraptions are on the market. Anyway, this is what mine looks like. 


View of drainage holes on the bottom:

I removed the loose-fitting lid to show the millet. Whatever setup you use, make sure the grain is covered to keep out dust, yet ventilated. 

As the French have it, a demain!


Friday, September 19, 2014

Sprouting Grains Day 2...Wait

Today, we don't need to do much, if you are sprouting millet as I am. It needs to continue its nice long soak! When hundreds of little bubbles appear (probably today if you are sprouting buckwheat), drain off the water and leave the sprouts so that they stay moist but not boggy. A picture of this step will follow tomorrow.

Thursday, September 18, 2014

Sprouting Grains Day 1

"Why bother?" You may be asking. I understand, for the longest time it seemed like too much trouble for me, too. However then I started loving my food, gaining health and losing weight on Trim Healthy Mama. I was on a roll, and I wanted...a roll. A really good roll. A nice big yeasted one. And pancakes, with a texture I love, but great kindness to my steadily shrinking waistline. A muffin that didn't contribute to my muffin top. 

Since I'm allergen free as well as gluten free, this posed a real challenge. I like to read cookbooks for fun (really!) and in my searches, I found it challenging to find gluten free recipes that didn't also feature a whole bunch of cornstarch, tapioca starch or arrowroot powder (none of which are weightloss friendly). In fact I didn't find any.

Back at the ranch, I experimented. If you've baked gluten-free before, you know that gluten-free flours can be finicky. But here is the exciting news. Sprouted gluten free flours are very friendly to bake with. They are forgiving, cooperative, tractable. I can improvise with them, in different proportions, and some are more amazing  than others but I haven't had to throw any away. They have all tasted good. This is amazing!!!

Sprouted grain flours have lots of nutritional benefits, too. Apparently, I'm in it for the taste and portion size and weightloss, though. I have known about the nutritional benefits for many years thanks to the Weston A. Price Foundation, and have always soaked my hot cereal overnight as an adult, but haven't acted on sprouting until now.

In the last few weeks, I've developed a pancake recipe that will knock your socks off. You will not believe how many pancakes you get to eat for breakfast, or how delicious they are, or that they contain enough protein to help you sail through your morning with aplomb. The portions are so generous, I was SURE it was two servings, at least one and a half, until I ran the numbers tonight. In short, you will love it, and its' cousins, THM E gluten free yeast bread that can be made in an afternoon and THM E berry muffin. I am salivating just thinking about them. 

But I digress. The point is, to make this quality and generous portion size of THM E gluten free baked goods, you'll need sprouted grain flour. There is a high-quality source for it here: http://www.organicsproutedflour.net/sproutedflour.html
The grains and flours are about $5 for a one pound bag, some more and some less. Plus shipping. A wee bit out of my budget for the time being. To make the recipes I mentioned above, you'll need sprouted millet and sprouted buckwheat flours. So, place your order at Organic Sprouted Flours, or let's get sprouting! I would be sad it you had to wait and wait for your flour to be done once I posted that pancake recipe. 

My method for sprouting is the same for every grain. These pictures are of millet. Once sprouted and dried, grains can be easily ground to flour using a normal blender (no vitamix required). What follows is day one. Not sure if you'll have the necessary tools? You will need: the grain itself, water, a big bowl or pot (preferably glass, second choice stainless steel), a mesh strainer, a dehydrator or a cookie sheet and oven.

Start with a nice big bag of the grain you want to sprout. 


Put it in a bigger bowl than you think you'll need (it will swell a lot) and fill to the top with filtered water if you have access to it. 


Stir a bit to make sure none of the grains are left floating (floatijg grains won't absorb water enough to sprout). 


Place bowl in an undisturbed part of the kitchen and place a cooling rack on top.


Tuck into bed by covering with a kitchen towel to keep out dust. 


If you like, say a little blessing and think loving thoughts. It is the love that helps it grow and later nourish your family. 

There, was that easy enough? See you tomorrow for next steps, dear reader! 


Monday, September 1, 2014

Bone Broth, AKA Fruits of the Spirit Juice

Can a food really make you more patient, more loving and more kind? This one can. How many recipes can do that? :)
I experience much greater health and happiness if I eat 2c of broth every day. It is the ultimate in fast food, too. It's great in a mug with a little sea salt, or heat it up with some meat and vegetables added and you have a gourmet meal in a matter of minutes. Broth, how do I love thee...let me count the ways! 


Basic Broth Recipe
Carcass from roasted chicken or turkey, picked clean (yum!), or beef / goat / pork bones, roasted at 350 until they smell delicious
Carrot
2 ribs celery
2 mushrooms
2 cloves garlic
1 onion or leek
4-6 peppercorns

Combine ingredients in a large pot, bring to a boil and simmer 24 hours.  Fill sink with cold water. Meanwhile, strain liquid into a different pot (if you have one). Place pot of strained broth in sink until no longer hot, but still plenty warm. Pour into quart-sized canning jars and cover with bands and lids. Return jars to sinkful of water to finish cooling. Some jars will seal. Put these at the back of the fridge; they will keep longer than the others. Use broth within 10 days. This recipe is very light, for THM you can use it as S or skim off most fat for E or FP.

Friday, August 22, 2014

Fresh Blueberry Mini-Pies (FP)

This is an historic recipe... one of the first THM recipes I created; I just tracked it down for a gal on Facebook. As you know I don't use Truvia anymore, but blueberries and hibiscus tea are both naturally sweet so it I made it again, I'd simply leave it out and perhaps reduce the amount of lemon juice. I labelled it "E" last year but it is "FP" in moderation. Enjoy!


What to do with fresh blueberries (E)! Yum yum yum! This totally takes me back to my mom's pie but has under 10 carbs as far as I can tell, and is in cute little individual servings. Boil 2 T dried hibiscus flowers (I got mine at our neighborhood Mexican market for $8 a pound) in 1 quart of water, then let sit with the lid on so it gets nice and strong. Meanwhile, wash and sort 1 1/2 to 2 c fresh blueberries, and divide among 12 cups of a muffin tin. Strain off the flowers from the still-hot tea, and add 2 T each of gelatin, lemon juice and truvia (I used homemade recipe from healthyindulgences.net), plus 1 t of salt. Pour over berries to fill each cup. Put leftover jello mixture in a loaf pan-- this can be a FP treat! Let it all firm up overnight in the fridge (sorry, a couple of hours doesn't cut it). To remove from muffin tin, invert tin over a cutting board and run warm water over it. Bon appetit!!

Thursday, August 14, 2014

Healing Kitty

The last two weeks our cat has been healing from a serious illness. She had lost interest in food and spent 4 days hiding under the sofa. It's been a week since she first ventured out, and every day she spends less time hiding and more time being her happy, social self.

As soon as we realized Ruthie was sick, we went into Food Is Medicine mode with her. Since she had been turning up her nose at her wet food, we bought fresh organic chicken liver, which we chopped fine and served in water to prevent dehydration. We sprinkled in a little bit of vitamin C, D and enzymedica probiotic. We tried adding homemade chicken broth instead of water, but she didn't go for that so much.

After a day of hand feeding (we were relieved she was at least eating!), we assessed that we needed more help; Ruthie still was not coming out from under the couch. Thankfully, our DVM does house calls and relies primarily on homeopathy (which our cat responds well to) and herbal medicine when needed. She visited a couple days into Ruthie's illness and determined that she had no blockages, she was not dehydrated and her health was generally good. She diagnosed some mouth sores and prescribed a one-time homeopathic remedy, as well as Diglyccerized Licorice, Slippery Elm and Aloe juice for her mouth. We've been mixing these in with Ruthie's food. 

A day after the vet came, I also got the feeling we should give Ruthie some Cod Liver Oil on a daily basis. I went to our coop and looked for CLO that did not contain any added essential oils or flavorings (cats cannot handle essential oils). I looked and looked and eventually found two types (same brand, Nordic Naturals) in the pet section. The one that I bought says "For Medium to Large Dogs" on it, but it was a better value and product than the one marketed for cats. We give her 1/4 teaspoon by dropper each night before feeding her. She seems a bit less offended each time. And she is doing great!

To maintain her wellness, we are feeding her "liver soup" (described in second paragraph) every other meal, and CLO every day. I have premade and frozen single servings of "liver soup" in ice cubes. Hope this helps you find wellness for your kitties! 

Sunday, June 29, 2014

Simplest GF Sourdough Pan Bread (THM E)

From the files of simplicity, here is another foolproof three ingredient recipe. Super tasty, too! When you crave toast, this is your go-to. The panbreads can be shaped into any size you prefer. I like making them sanddollar sized, but they could definitely hold their own as sandwich or mini-pizza material. They are delightfully chewy and have the rich sourdough flavor of sharp cheese (a huge plus for this dairy free girl!).


1/3c active sourdough starter, allowed to settle and any clear liquid poured off*
1t psyllium husks
2 pinches of salt

Heat a cast iron skillet until very hot. Meanwhile, combine all ingredients and let sit just a moment, for batter to thicken. Shape breads with your hands- I like to make little balls the size of walnuts and then make them as thin and flat as I can. Place three in the pan (more if they fit) and cover. Flip with a good spatula when bread is golden and pan releases bread. Cook until golden color is achieved on the other side. Enjoy!! 

*To create your own sourdough starter, visit here to see the first day in the wild sourdough series: http://barcodefree.blogspot.com/2013/12/gluten-free-wild-sourdough-day-1.html?m=1

Friday, June 27, 2014

Cookie Dough!! (gf, df, sweetener free, THM FP)

Ohhh I nearly lost my countenance tonight. Supper was very good, but not filling enough for this hungry gal, and my usual stand-bys were not going to cut it. I craved variety. I headed on over to the blog Whole New Mom because I was thinking of making her Chocolate or Carob Chia Seed Pudding into a FP recipe, and this somehow resulted. Mmm. I have a feeling I'll be making this again very soon!!! :) When I do, I'll snap a photo.

FP Allergen Free Cookie Dough
1T chia seeds
Pinch salt 
1T carob
contents of 1 capsule sunflower lecithin
1/4t vanilla
2T water
1T brazil nut protein powder

Using a ball jar attached to your blender, grind chia seeds alone until powdery. Add other ingredients except water and brazil nut protein powder and blend again. Remove from blender and stir in remaining ingredients. Eat with a spoon and feel decadent. :)

5.12g fat
4.6g usable carb
7g protein

Saturday, June 21, 2014

Cran-Raspberry Pudding (FP, GF, DF, purist-friendly, sweetener free)


This beautiful FP pudding brings back childhood memories of yummy juiceboxes at lunch. It is so light, it is the perfect slimming late-night snack!

Editorial note: I had been sugar- and sweetener-free for a couple of months before developing this recipe. It is tart. If you like, you can add a desired amount of sweetener along with the salt and the lemon extract, or use a full Tablespoon of coconut butter to make the recipe a sweeter-tasting S treat. 

1c warm water
2T gelatin
1/4t salt
1/4t lemon extract
1t coconut butter (or 1T for a sweeter, S treat)
Handful frozen raspberries (1/4c)
Handful frozen cranberries (1/4c)
4 or more ice cubes

Whiz warm water in blender, and while blender is running add gelatin. Add salt, lemon extract and coconut butter. Assemble frozen goods on the counter, and working quickly, add cranberries, raspberries and 4 ice cubes. Allow blender to run. It may thicken after a few moments. Turn off blender and pour into bowl. Depending on the temperature of your water and the size of your ice cubes, you may need to add more ice to achieve a temperature low enough to thicken. Serves one. Enjoy!!! 

Thursday, June 12, 2014

Barcode Free Shirt

This is different... so far all my posts here have been food-related. But today, I was too hot and had Nothing To Wear. I have one nice, professional short sleeved button down shirt, which is in the laundry. Otherwise, I have some workout t-shirts and a drawer full of turtlenecks. That was not going to cut it in this town, where afternoons are often above 95 degrees in summertime. How did this even happen?

Anyway, I was loathe to spend money on something made in unhappy factory conditions (even at a goodwill). It seems to perpetuate our culture's image of how one should dress... at the expense of others. 

So, instead of heading out to spend a couple of soul-sucking hours in dressing rooms listening to bad music, I decided to make myself a new shirt. I've been dabbling in sewing without a pattern, and today I took the plunge with one yard of fabric I had on hand. Here is the result:


Not a great picture but I highly recommend this style if you want to experiment at home!! I made the top huge enough to fit anyone, then added elastic at the neck and adjusted until it fit. It took 3 hours at most and I'm wearing it to a play tonight.

Happy sewing, friends!!

P.s. Just for fun, when I got home from the play, I used the scraps to make a headband. There went two hours... oops. :) I like the result though! I used the directions in the great book We Love to Sew by Annabel Wrigley to create the Shibori flower. 


Saturday, June 7, 2014

Three Ingredient Skillet Biscuits

These are so quick, so easy and so good! They don't require any dairy or gluten ingredients and are a perfect E addition to a meal. I eat this whole recipe, which makes four or five biscuits, as one serving, alongside an additional protein source and vegetable. These also make a good breakfast if you smother them with berry pudding. You might be more generous than me and choose to share, or scale up the recipe. Hope you enjoy it!

(Shown here in a supporting role as a foundation for strawberry shortcake. Lemon pudding serves as faux whipped cream.)


2 egg whites
1/3c quinoa flakes
salt to taste

Turn on the heat under seasoned a cast iron skillet and allow pan to get very hot. Do not oil pan; oil would smoke at this temperature. Meanwhile, using a fork, combine all ingredients. Plop into pan, cook a minute or two, then flip using a good metal spatula. Cook another minute or two and serve immediately. Bon appetit!

Notes

I do not use oil in this recipe because it would smoke in the very hot pan. However if you do not have a cast iron pan, run to local flea market as fast as you can-- I mean, use a stainless steel pan with a little oil.

Quinoa flakes can be purchased here, though they would probably be cheaper in the bulk section of your coop: http://m.vitacost.com/products/ancient-harvest-organic-quinoa-flakes-gluten-free-12-oz-7

If you do not currently have access to quinoa flakes and need to substitute oats, use a blender to chop them up before using them in this recipe: Full disclosure: I haven't tried this because I can't eat oats. ;)


Thursday, June 5, 2014

Chocolate (or carob) Chia Seed Cream Pie

We've been really enjoying this for months, and somehow it slipped through the blogging cracks so I'm finally posting it now. It is a lovely snack or dessert and very adaptable. Since I'm now sweetener free, I use carob, which has a naturally sweet taste. I usually pour it into 1/2c mason jars and dole them out as desserts for lunches. Hope you enjoy it as much as we have! For people on THM, this is an S. Anyway, hope you enjoy it. Let me know if you like it! :)

1 can coconut milk (full fat or lite)
3T chia seeds
1 egg yolk (I often use 2, to get more nourishment into my family members)
1/4c cocoa powder plus eight drops stevia OR 1/4c carob powder
1t vanilla
1/2t orange oil
1T gelatin
1/4t salt
Heat coconut milk. Whisk in all other ingredients one by one, waiting to add gelatin until milk steams slightly. Continue to cook and stir until mixture thickens slightly. Bon appetit!

Note on September 23rd: I LOVE to double this recipe and put it in 1/2c jars. That makes a great pudding-to-go. I like to put the hot jars of pudding in a cold water bath so they seal, as this helps them keep (they must be refrigerated, of course). A double batch yields nine jars, which are great packed in lunches. 


Nutrition Facts for 6 Servings
Full fat coconut milk and chocolate:
fat 15g, protein 3g, net carb 3.5g
Lite coconut milk and chocolate:
fat 7g, protein 2g, net carb 2g
Full fat coconut milk and carob:
fat 14.7g, protein 2.4g, net carb  4.5
Lite coconut milk and carob:
fat 6.8g, protein 1.6g, net carb 3g

Note on 10/4/14: I most often make this with full fat coconut milk and carob, and add an extra egg yolk. It is delish this way and I make it more for my family than myself, though I occasionally will have one. Usually I get four servings per batch. To satisfy my own curiosity, I ran the numbers on this and found that the nutrition facts, served this way, are 23g fat, 4.23g protein, and a whopping 6.9 usable carbs.  If you are a THM, try not to add any other carb source to this S meal, but please do make sure to add another source of protein. 

Sunday, May 25, 2014

Two New Pudding Recipes (FP)

I've been embracing foods that have good carbohydrates in them recently. Two delicious new recipes reflect this shift: Berry Pudding and Tropical Pudding. For THM folks, while these are FP recipes, you could add up to 1/4 banana to make this an E, OR up to 1T coconut butter to make it S.  I hope you enjoy them!!!


Berry Pudding
3/4 c warm water
1/4t salt
dash vanilla
2T gelatin
1t coconut butter
1/4c blueberries, blackberries or raspberries
Optional add ins: 1" slice banana, generous amount of cinnamon, 2T brazil nut protein powder (makes for a more bery cobbler flavor, yum!)
Ice

Whip warm water, salt, gelatin and vanilla in the blender until foamy. Add coconut butter. In quick succession, add 1/4c frozen blueberries and 4 ice cubes. Blend until well-combined and thick. If mixture fails to thicken, add more ice cubes.

Tropical Pudding (a.k.a. The Craving Crusher, my favorite way to resist temptations)
3/4 c warm water
1/4t salt
dash vanilla
2T gelatin
1t coconut butter (optional)
1T carob powder
2T brazil nut protein powder 
Cinnamon to taste
1" slice of banana
Ice

Whip warm water, salt, gelatin and vanilla in the blender until foamy. Add coconut butter, carob, cinnamon and brazil nut protein powder. In quick succession, add banana slice and 4 ice cubes. Blend until well-combined and thick. If mixture fails to thicken, add more ice cubes.

Saturday, May 3, 2014

Pear Coffee Cake with Brazil Nut Crumb Topping


This recipe was inspired by Mrs. Criddle's Upside Down Apple Cake. Thanks Mrs. Criddle! Though it doesn't bear much resemblance to the original, it wouldn't have come about without it.

The week I experienced a windfall of 6 ripe pears, purchased for 25 cents a pound. Score! They have been the subject of my experimentation here. I'm sure you could use apples successfully in this recipe, as well. I'm really happy with the result!! 

This recipe serves two. Hint: Serve with another source of protein... I like it with a smoothie. :)

Crumb Topping

2T brazil nut protein powder
1/2t cinnamon
Dash freshly-ground nutmeg
Pinch of salt
1t coconut oil

Combine dry ingredients. With a fork, mash in coconut oil. 

Cake Batter
2/3c quinoa flakes
1/2t salt
1/2t baking powder
1t cinnamon
Dash of fresh nutmeg
1t vanilla
4 egg whites
1 pear, cored and diced into 1/2" cubes

Preheat oven to 350. Lightly grease glass loaf pan with coconut oil. Combine dry ingredients. Add vanilla and egg whites and mix well. Swirl in half of crumb topping. Gently fold pear into batter. Using a rubber spatula, gently coax mixture into loaf pan. Sprinkle remaining crumb topping on top. Place pan in the oven. Bake cake a total of 30 minutes, and let sit in pan until mainly cool, 20 minutes. Enjoy!

Per Serving (2 Servings) Net Carbohydrate 34g Protein 16g Fat 5.5g


Wednesday, April 30, 2014

Nutter Butter Pudding (FP)

(Action shot: adding the ice cubes)

Wowser, that was a good breakfast. Blog post worthy. Yaaay! It's been a little while since a meal swept me off my feet so I'm thrilled. And I cannot believe it is FP! It is so good and so filling!

I've been trying to integrate brazil nut protein powder into puddings for a week or so. Happily, 2T of protein powder and 1T of banana are a match made in heaven. The texture is perfect-- creamy, rich and light at the same time. 

3/4c very warm water
2T gelatin
1t coconut butter
1/4t salt
2T brazil nut protein powder
1t maca powder
1T cocoa powder
Splash of vanilla
1T banana (I just cut off a piece of a frozen one)
4 or more ice cubes

Place warm water in the blender. While running, gradually add gelatin and coconut butter. Allow to whiz while assembling other ingredients. Add salt, brazil nut protein powder, maca, cocoa powder and vanilla. Next, add banana and blend well. Then add ice cubes in short succession. Blend until mixture is thick. If mixture doesn't thicken, it just isn't cold enough yet; add more ice cubes until it does. Enjoy!


Serves one.

Banana 2g carb
Coconut butter 3g fat 1g carb 
Brazil nut protein powder 1g fat 3g carb 10g protein
Cocoa powder 1g fat 1g carb 1g protein
Gelatin 18g protein

Fat 5g 
Usable Carbohydrate 7g 
Protein 28g


Thursday, April 24, 2014

Cafe Mocha Pudding FP (gf, df, sweetener free)

This pudding is in honor of my mom. She taught me that a good meal, made from scratch, can solve just about everything. Thanks to her, I learned how to keep a proper pantry, always eat good food and never run out of eggs. ;) 

This recipe reminds me of her because she loves coffee ice cream, and has had a lifelong love of France and all things French since first visiting there in college. Despite working full-time and raising three daughters she has followed her heart and returned there many times. She has been married to my dad for more than forty years. 

My mom is super creative, and even during the busiest times she had projects going... handknits for us girls, handsewn clothes for herself. These days her medium of choice is quilting. 

And she can teach, and raise kids well. What have I not learned from my mom!? I am SO blessed. 

(I have a wonderful dad too. I'll tell you about him sometime when I develop a great recipe for roasted cashews ;) ).

And now for the Cafe Mocha Pudding recipe. Isn't it pretty? 


It is also packed with protein and ready in minutes. Best of all, though it is FP, it always seems like a big treat!

3/4 c warm prepared coffee (or warm water if using an espresso ice cube)
2T gelatin
1T cocoa powder 
1/2t vanilla
1/4t salt
1t coconut butter (optional; feel free to omit or increase to 1T for S)
Ice cubes (one espresso if not using warm coffee)

Whiz warm liquid in blender. Add gelatin and remaining ingredients except ice cubes; allow to combine well. Add 3 ice cubes in quick succession until only slightly thicker, like a frappe. If it doesn't thicken at all, even after blending for a few moments, add one more ice cube and watch carefully for signs of thickening for a while longer. The more ice cubes you add, the thicker it will be, and it's possible to add too many-- it is better to err on the side of too few. I personally find that I prefer a light, fluffy pudding. Immediately pour into your serving dish as it will set in just a moment. Serve immediately; this dish is quick to make and does not store well. Bon appetit!

Espresso Ice Cubes
2T coarsely ground coffee
I devised this method because I am a clueless non-coffee-drinker and don't own a funnel, filter etc. I'm also thrifty, and want to extract the maximum coffee goodness from my fair trade organic coffee (please buy this!). Put ground coffee in a tea ball. Pour 2c boiling water over the top and let steep until cool. Pour liquid into ice cube tray. Then, boil more water and rebrew the coffee, allow to cool, and freeze that too. You'll end up with some espresso ice cubes and some coffee ice cubes, which is handy so you can choose the best amount of caffeine for you at any given time. 

Sweetener-Free GGMS

GGMS stands for Good Girl Moonshine-- a drink created by Pearl and Serene, the THM sisters. It is truly delicious but really needs a sweetener to make it taste right. Since I'm on break from sweeteners but hooked on GGMS, I created this drink. YUM! And since lemon juice supports the liver, your body will thank you. 

Water
2 teabags Yogi Tea Ginger
1/2t salt
1 capsule sunflower lecithin
Dash lemon oil
Splash lemon juice (2-4T; can substitute some or all with Apple Cider Vinegar)

Boil 2c water and pour over teabags. Let steep until cool or overnight. I reserve teabags for a second use; in Jane Austen's day they were reused five times! Pour tea into blender and add contents of lecithin capsule (for slight creaminess and to emulsify lemon oil) and 1/2t salt (for electrolyte balance). Whiz for a minute or so, then add lemon juice and lemon oil. Pour into a 1/2 gallon jar and fill to the top with cold water. Important: do not drink more than half of this all in one sitting please! Been there and done that. Oops. But do try to drink a gallon of fluids a day, your body will thank you. :) This yummy drink will make that easy. Enjoy!

Saturday, April 19, 2014

Cocomint Skinny Chocolate (df, sweetener free)

Whoa. That was some GOOD skinny chocolate. So good, I must post the recipe... and perhaps make more to take a picture. We'll see how long it lasts once I do. ;)

If you can't do sweeteners, and also do not thrive on popular low-carb sugar substitutes, I hope this recipe will bless you.

2T coconut oil, melted
1T coconut butter
dash of mint flavor (I use frontier organics)
2T shredded unsweetened coconut
1T unsweetened cocoa powder
1 t maca powder (sneaky supplement-- I use to balance hormones-- feel free to omit)

First, put a plate in the freezer (I often leave one in for when the urge strikes). This prevents the skinny chocolate from sticking to the plate, and helps it set in a flash. 

Melt coconut oil in a metal measuring cup on the stovetop or over a cup of tea. Meanwhile, measure dry ingredients into a small bowl. As soon as coconut oil has mainly liquefied, remove from heat (if a couple little lumps remain, swirl with a fork). Mash in coconut butter until well combined. Add mint flavor and dry ingredients and stir well. 

Pour onto frozen plate, return to freezer and patiently wait two minutes until it magically solidifies.  Enjoy!! Serves one. 

Thursday, April 17, 2014

Raspberry Creme Pudding

As you can see from my recent flurry of posts, I have been really enjoying liquid stevia lately. It makes everything taste so sweet and yummy! However, at the end of a weekend full of puddings and iced tea by the half gallon, I found myself a sneezin' fool. Can it be that I am one of the few for whom stevia causes ragweed allergy symptoms? I decided that stevia and I must take a little break to assess whether or not this was true.

I did not go quietly into this decision. Let's say I was irked. My first full day with No Treats I was so miffed I ate more than my share of peanuts-- and usually I don't eat any nuts whole as they are a trigger food for me. Thankfully I snapped out of Eeyoring about it and got busy in the kitchen. 

Today is Day 4 and I have finally figured out a FP pudding worthy of posting. The sweetener-free puddings I came up with Monday-Wednesday ranged from "okay" to "definitely better than yesterday" to "GROSS!" to "good, but weird." None were blog-worthy until now. I don't know to what degree my tastebuds have changed in four days, but this one is great! Thank heavens I have found a new FP reason to get out of the bed in the morning! 

3/4c warm water
2T gelatin
2t coconut butter
1/2t or more cinnamon
1/4t salt
dash lemon flavoring
dash vanilla
6-8 raspberries
3 or more ice cubes

Whiz water in the blender, gradually adding gelatin. Add coconut butter, then remaining room-temperature ingredients. Add blackberries, then ice cubes two at a time. If pudding suddenly gels after the first two ice cubes, just go with it-- your pudding is done! :) If not keep adding ice cubes until it does. Enjoy the magical transformation of your treat today and of your body over time! 

Protein: 18g Carbohydrate: 1g from coconut butter (I don't  add in the carbs from blackberries) Fat: 5.33333 repeating grams ;)

Variation: Cocoa Pudding (almost FP, barely S)
3/4c warm water
2T gelatin
2 t coconut butter 
1T cocoa powder
scant 1/4t salt 
dash of vanilla 
4 or more ice cubes
Protein: 18g Carbohydrate: 2.5g Fat: 6g
To make this FP, use only 1t coconut butter.

Sunday, April 13, 2014

Just Like Commercial Lemon Iced Tea

Hooray! I've recreated the flavor of commercial lemon iced tea in my kitchen, without the excess sugar. I am in love with this drink! After years of "just water for me, please," it is a huge treat. I make this every day now. What a tasty way to stay hydrated!

2 teabags or 2t loose black tea (fair-trade and organic)
1 capsule NOW sunflower lecithin (contents only; discard shell)
1/2t salt
20 drops NOW liquid stevia (organic)
dash lemon flavoring (I use frontier)
2t lemon juice

Brew one cup of very strong tea; let cool. Combine tea with other ingredients and blend until white and frothy. Pour into a half gallon jar and fill to the top with water. Enjoy!! 

Wednesday, April 9, 2014

Sprouted Brown Rice Tortillas

This week I set off in search of a cheap, organic, sprouted, homemade-with-love, gluten free, low-glycemic, lowfat tortilla recipe and.... didn't find one. So, I made one up. And it worked! Huzzah. 


These are replacing Food for Life Brown Rice Tortillas in my diet. They are a lovely product, but I knew a homemade version
could be cheaper, healthier and better.

No further ado, as I must go to bed, and really want to post this tonight. It is a generous serving for one, but you could probably make it last two meals. Or make little ones and toss them in the dehydrator after stovetop cooking, to make crackers. Enjoy this recipe!! 


2T sprouted brown rice flour
2T sprouted millet flour*
2T sprouted buckwheat flour*
1t psyllium husks (not powder-- I understand you would only need to use a rounded 1/4t of the powder, but haven't tried this myself)
1/4t salt
3T water

Heat seasoned cast iron skillet on the stove (do not add any oil). In a small bowl, whisk together dry ingredients. Stir in the water, a tablespoon at a time, with a fork. Divide and roll into 2 or 3 balls. One at a time, place the ball of dough between pieces of parchment paper. Roll out through the paper with a rolling pin. Place the whole thing, paper and all, in your skillet. Safety note: stay right near the stove to keep an eye on things no matter what! Flip tortilla in the parchment paper after a couple of minutes. Then, once it is apparently fully cooked, remove it from the parchment paper to brown a little. Repeat rolling and cooking steps with remaining ball(s) of dough. 


Scrumptious if I do say so myself!! And at least as flexible as the Food For Life Tortillas, if not more flexible. :) I ate them on their own tonight but burritos are in my future now.


p.s. Full disclosure: I do not yet have sprouted millet or buckwheat flours. I ground hulled unsprouted raw buckwheat in my blender, then unsprouted raw millet, to accomplish this recipe. I did use sprouted brown rice flour from the bulk foods section of my coop. I'm sure this will work with sprouted millet and buckwheat flours. I'm going to start soaking those grains tonight, so I can sprout, dehydrate and grind them. I will report back with an update later. In the meantime, these flours are available pre-sprouted and ground here: http://www.organicsproutedflour.net

P.p.s. I'll leave you with an image of my kitchen, when I am in mad scientist mode. Many thanks to my partner for patience and photography. :) 


Note added in August: finally got my millet and buckwheat sprouted and dried. Tried this recipe again. My goodness, it was wonderful! Chewy, flexible, moist. Delicious. Instead of dividing into 2-3 balls, I kept it in one piece for a regular-sized tortilla. 

Note added 9/18/14: I just double-checked that this recipe serves one for a THM E meal. It came out at 33.75g net carbohydrate, which leaves a little room for 1/3c beans in your burrito. Yaaay!